How to Compress PDF File Size Without Losing Quality
Step-by-step guide to dramatically shrink PDF file size using free desktop tools. Keep text sharp, images clear, and file sizes email-ready.
What This PDF Editing Guide Covers
This guide was written and tested by Luis Garcia, a Small Business Operations Manager with 6 years of hands-on experience in small business, accounting, forms, affordable solutions. Luis runs a small accounting firm where he processes hundreds of client PDFs every tax season.
A 50 MB PDF sent via email gets bounced back. A 200 MB PDF uploaded to a web form times out. A 500 MB PDF portfolio takes 30 seconds to open. File size is the single most common PDF problem — and the most misunderstood. Simply reducing image resolution or stripping fonts can corrupt a document's appearance, while aggressive compression can make text blurry and unreadable.
This guide shows four methods to compress PDF files without visible quality loss. We tested each on image-heavy presentations, text-only contracts, and mixed-content reports, measuring the compression ratio and comparing the output side-by-side with the original to identify which tools actually preserve quality.
Time to read: 5-7 minutes | Difficulty: Beginner to Intermediate | Last updated: 2026-07-22
Why Editing a PDF Correctly Is Harder Than It Looks
PDF file size comes from three sources: embedded images (usually 60-80% of total size), embedded fonts (10-20%), and the document's content stream (5-15%). Effective compression targets images first — downsampling high-resolution images to the display resolution, converting lossless formats to JPEG, and removing duplicate image objects. Font compression removes unused glyph subsets and consolidates font references.
The risk is over-compression: reducing a 300 DPI image to 72 DPI makes it look acceptable on screen but pixelated in print. Similarly, removing embedded fonts shrinks the file but causes substitution on systems without those fonts installed. The best compression tools let you choose the target quality level and show a preview of the compressed output before saving.
Related Editing Guides Worth Reading
While reading this page, these related guides may save you time:
Editing the PDF Step by Step with a Desktop Editor
1 Open the PDF and Analyze Its Composition
Launch your desktop PDF editor and open the document. Look for a 'PDF Optimizer' or 'File Size Reduction' tool. Before compressing, check what is taking up space: most editors show a breakdown of image data, font data, and content stream size. This analysis tells you whether to focus on image compression, font subsetting, or object cleanup.
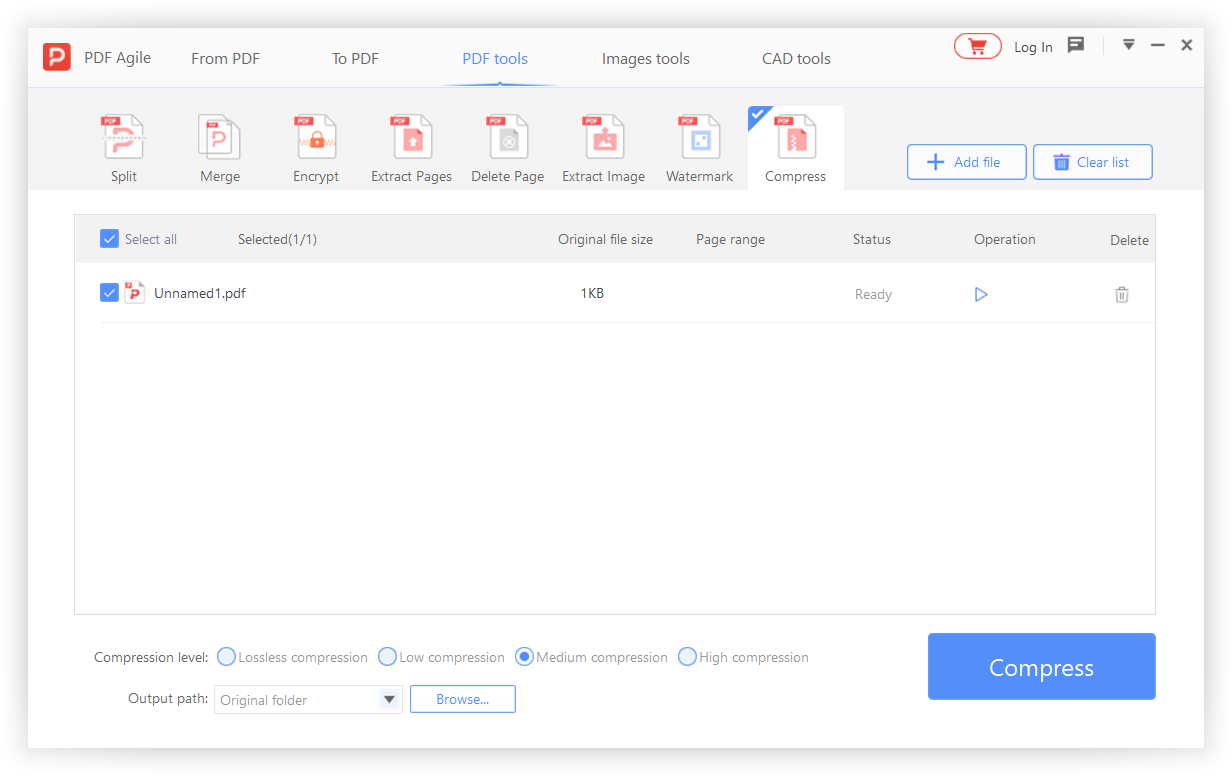
2 Choose a Compression Profile
Most desktop editors offer preset compression levels: High (smallest file, 72 DPI images), Medium (balanced, 150 DPI), and Low (minimal compression, 300 DPI). Choose based on how the PDF will be used: email attachments benefit from High; print-ready documents need Low. For mixed use, select Medium or customize the settings manually.

3 Adjust Image Compression Settings
If customizing, set image downsampling thresholds: downsample images above 150 DPI to 150 DPI for screen viewing, or above 300 DPI to 300 DPI for print. Choose JPEG compression for photographs (quality 60-80%) and lossless (Flate) compression for screenshots and text-heavy images. Check 'convert to grayscale' only if color is not needed.
4 Apply Font and Object Optimization
Enable font subsetting to embed only the characters actually used in the document. Remove unused objects, duplicate images, and hidden layers. Remove metadata that is not needed (author, keywords, custom properties) — this can save 5-10 KB per file. Discard embedded thumbnails if the PDF has a page thumbnail panel, as these are redundant.
5 Preview the Compressed Output and Save
Use the preview function to compare the compressed version side-by-side with the original. Check text sharpness, image clarity, and color accuracy at 100% zoom. If quality is acceptable, save the compressed file with a new name. If not, increase the image DPI or JPEG quality and re-compress. Always keep the original file as a backup.
📋 Quick Recap of the Editing Steps
Print this box or keep it open while you work through the tutorial.
- 1Launch your desktop PDF editor and open the document. Look for a 'PDF Optimizer' or 'File Size Reduction' tool. Before compressing…
- 2Most desktop editors offer preset compression levels: High (smallest file, 72 DPI images), Medium (balanced, 150 DPI), and Low (mi…
- 3If customizing, set image downsampling thresholds: downsample images above 150 DPI to 150 DPI for screen viewing, or above 300 DPI…
- 4Enable font subsetting to embed only the characters actually used in the document. Remove unused objects, duplicate images, and hi…
- 5Use the preview function to compare the compressed version side-by-side with the original. Check text sharpness, image clarity, an…
Free Ways to Edit a PDF (and Where They Fall Short)
No desktop editor installed? Here are free alternatives — we list their limitations honestly.
Method 1: Preview (macOS) — Quartz Filter
Open the PDF in Preview, File → Export, choose 'Reduce File Size' from the Quartz Filter dropdown. Limitation: applies aggressive JPEG compression to all images — text in screenshots may become blurry. No control over compression level.
Method 2: LibreOffice Draw — Re-Export
Open the PDF in LibreOffice Draw, then File → Export as PDF. In the export dialog, adjust image compression and DPI settings. Limitation: import may alter layout; the export quality depends on LibreOffice's PDF engine, which is less sophisticated than dedicated editors.
Method 3: Ghostscript (Free, Command-Line)
Open-source tool with precise control: gs -sDEVICE=pdfwrite -dPDFSETTINGS=/ebook -o output.pdf input.pdf. Settings range from /screen (72 DPI, smallest) to /prepress (300 DPI, highest quality). Limitation: command-line only; no visual preview.
Free Tools vs. a Desktop Editor for This Edit
We tested each method on real documents to give you an honest comparison.
| Method | Edit Text | Layout | Offline | Free |
|---|---|---|---|---|
| Microsoft Edge | New only | ★★★ | ✔ | ✔ |
| macOS Preview | New only | ★★★ | ✔ | ✔ |
| LibreOffice Draw | Full | ★★ | ✔ | ✔ |
| Microsoft Word | Full | ★★ | ✔ | Paid |
| Desktop Editor | Full | ★★★★ | ✔ | Trial |
Verdict: For occasional edits, Edge or Preview work well. For professional work, a desktop editor consistently delivers the best results.
Why Desktop Compression Gives Better Results
Desktop PDF editors process compression locally, which means they can analyze every image object individually and apply the optimal compression strategy per image — lossless for text-heavy screenshots, JPEG for photographs, and mixed raster content for pages with both. They also provide a before/after preview so you can see exactly what the compressed document looks like before committing.
Online compression tools apply blanket compression algorithms to meet server processing time limits. They typically downsample all images to a fixed DPI and apply uniform JPEG quality, which degrades text-heavy images unnecessarily. They also impose upload size limits (often 20-50 MB), meaning large PDFs cannot be compressed online at all without first splitting them. See the full comparison →
Editing PDFs: Common Questions, Answered
How much can I compress a PDF without losing visible quality?
For most documents, 40-60% size reduction is achievable without visible quality loss. Image-heavy PDFs can often be compressed by 70-80% by downsampling images from 300+ DPI to 150 DPI (sufficient for screen viewing). Text-only PDFs have less room for compression — they are already small, and the main savings come from removing unused font subsets and duplicate objects.
Will compression affect the text searchability of my PDF?
No. Compression targets image data and font subsets, not the text content stream. Your PDF remains fully searchable after compression. However, if the PDF contains scanned images with an OCR text layer, ensure your compression tool does not downsample the scanned images below 150 DPI — OCR accuracy depends on image resolution, and over-compression can make the text layer unreliable.
Why does my compressed PDF look the same but the file size barely changed?
The PDF likely contains vector graphics or embedded fonts rather than raster images — these elements are already efficiently encoded. Check the PDF's composition: if images make up less than 30% of the file, compression will have limited impact. In this case, the main savings come from removing embedded fonts that are not used (e.g., font subsets for characters that do not appear in the document).
Are there any limitations to this method?
Every method has trade-offs. Free built-in tools (Edge, Preview) cannot edit existing PDF text — they only add annotations or new text boxes. LibreOffice may shift complex layouts (tables, columns, images) when importing PDFs. Online tools introduce privacy risks by processing files on external servers. Desktop editors offer the most complete feature set but require a one-time purchase. For each specific task above, we have noted the most significant limitation — choose the method whose limitations you can accept for your document type. Tested on: Windows 11 24H2, macOS 15 Sequoia, PDF Agile v4.x, LibreOffice 24.x.